当需要为服务器增加一个自定义的扩展功能时,需要用到模块,相当于Nginx给开发者提供的一个模板范式。
比如现在实现一个书签收藏网站的signin功能,用Flask框架可以这样实现:
@app.route('/signin', methods=['GET', 'POST'])
def web_signin():
	if request.method == 'GET':
		return redirect(url_for('web'))
	if request.method == 'POST':
		name = request.form.get('username', None)
		session['username'] = name
		password = request.form.get('password', None)
		db = LinkDB()
		if name.strip()=='' or password.strip()=='':
			return redirect(url_for('web'))
		if db.has_user(name, password):
			return render_template('page.html')
		else:
			return '用户名或密码错误'
它实现的功能就是解析用户GET和POST过来的数据,然后构造相应的响应。这和Nginx的handler模块所做的工作相似。
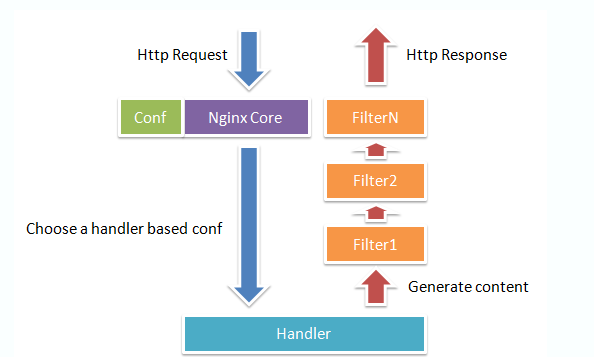
Nginx本身做的工作实际很少,当它接到一个HTTP请求时,它仅仅是通过查找配置文件将此次请求映射到一个location block,而此location中所配置的各个指令则会启动不同的模块去完成工作,因此模块可以看做Nginx真正的劳动工作者。下图表示一次请求和相应的完整过程。
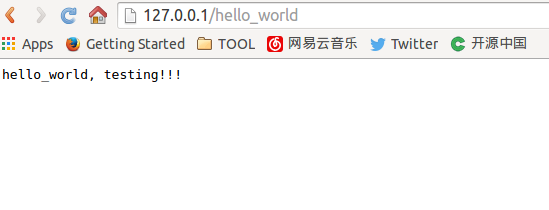
现在在浏览器中输入http://127.0.0.1/hello_world,让浏览器显示
hello_world, testing!!!怎么实现呢?这需要我们编写一个hello handler模块。
模块定义ngx_module_t
开发一个模块,需要定义一个ngx_module_t类型的变量来说明这个模块的信息。它定义在/nginx/src/core/ngx_config_file中。
struct ngx_module_s {
    ngx_uint_t            ctx_index;
    ngx_uint_t            index;
    ngx_uint_t            spare0;
    ngx_uint_t            spare1;
    ngx_uint_t            spare2;
    ngx_uint_t            spare3;
    ngx_uint_t            version;
    void                 *ctx;
    ngx_command_t        *commands;
    ngx_uint_t            type;

    ngx_int_t           (*init_master)(ngx_log_t *log);
    ngx_int_t           (*init_module)(ngx_cycle_t *cycle);
    ngx_int_t           (*init_process)(ngx_cycle_t *cycle);
    ngx_int_t           (*init_thread)(ngx_cycle_t *cycle);
    void                (*exit_thread)(ngx_cycle_t *cycle);
    void                (*exit_process)(ngx_cycle_t *cycle);
    void                (*exit_master)(ngx_cycle_t *cycle);
    //...
};
hello模块定义如下:
ngx_module_t ngx_http_hello_world_module = {
    NGX_MODULE_V1,
    &ngx_http_hello_world_module_ctx,
    ngx_http_hello_world_commands,
    NGX_HTTP_MODULE,
    NULL,
    NULL,
    NULL,
    NULL,
    NULL,
    NULL,
    NULL,
    NGX_MODULE_V1_PADDING
};
模块的编写步骤是:
- 编写模块基本结构。包括模块的定义,模块上下文结构,模块的配置结构等。
- 实现handler的挂载函数。根据模块的需求选择正确的挂载方式。
- 编写handler处理函数。模块的功能主要通过这个函数来完成。这是最关键的,hello模块的功能是简单返回一个字符串。在
ngx_http_hello_world_handler中实现。
static ngx_int_t ngx_http_hello_world_handler(ngx_http_request_t* r) {
    ngx_int_t rc;
    ngx_buf_t* b;
    ngx_chain_t out[2];
    ngx_http_hello_world_loc_conf_t* hlcf;
    hlcf = ngx_http_get_module_loc_conf(r, ngx_http_hello_world_module);

    // 设置 request 的 header
    r->headers_out.content_type.len = sizeof("text/plain") - 1;
    r->headers_out.content_type.data = (u_char*)"text/plain";

    // 分配缓冲区的内存空间
    b = ngx_pcalloc(r->pool, sizeof(ngx_buf_t));

    // 第 1 块缓冲区
    out[0].buf = b;
    out[0].next = &out[1];

    // 本模块中,缓冲区只需要写入数据,所以只设置 pos 和 last
    b->pos = (u_char*)"hello_world, ";
    b->last = b->pos + sizeof("hello_world, ") - 1;
    b->memory = 1; // 标示缓冲区是内存缓冲

    // 分配缓冲区的内存空间
    b = ngx_pcalloc(r->pool, sizeof(ngx_buf_t));

    // 第 2 块缓冲区
    out[1].buf = b;
    out[1].next = NULL;

    // 本模块中,缓冲区只需要写入数据,所以只设置 pos 和 last
    b->pos = hlcf->output_words.data;
    b->last = hlcf->output_words.data + (hlcf->output_words.len);
    b->memory = 1; // 标示缓冲区是内存缓冲
    b->last_buf = 1; // 标示整个响应最后一个缓冲区,nginx会立即发送缓冲的所有数据

    // 设置 request 的 header
    r->headers_out.status = NGX_HTTP_OK;
    r->headers_out.content_length_n = hlcf->output_words.len \
    + sizeof("hello_world, ") - 1;

    // 发送 request
    rc = ngx_http_send_header(r);
    if (rc == NGX_ERROR || rc > NGX_OK || r->header_only) {
        return rc;
    }

    return ngx_http_output_filter(r, &out[0]);
}
配置和编译
在Nginx文件夹下
mkdir ngx_http_hello_world_module
cd ngx_http_hello_world_module
touch ngx_http_hello_world_module.c
touch config
ngx_http_hello_world_module.c是主要的函数,config是配置文件。
在配置文件中加入
ngx_addon_name=ngx_http_hello_module
HTTP_MODULES="$HTTP_MODULES ngx_http_hello_world_module"
NGX_ADDON_SRCS="$NGX_ADDON_SRCS $ngx_addon_dir/ngx_http_hello_world_module.c"
这个config文件的内容就是告诉nginx的编译脚本,该如何进行编译。
./configure  --add-module=/home/hy/Desktop/nginx/ngx_http_hello_world_module
make
make install
add-module后接上文中新建目录的路径。
##使用
在/usr/local/nginx/conf路径下的nginx.conf文件中加入
location /hello_world
{
    hello_world testing!!!;
}
访问http://127.0.0.1/hello_world即可看见成功的页面。
##参考
http://blog.csdn.net/poechant/article/details/7627828